About OpenID Connect
Introduction
Centrify provides support for many different federation standards. OpenID Connect is a popular federation standard that is supported by Centrify. This document provides an overview of how OpenID Connect works, describes how to configure an application in the Administrator Portal, and describes how to authenticate users programmatically in applications.
Terminology
To understand how authentication works, you need to know the following terms and acronyms:
- Client: An application, such as a website or a mobile application used to access Centrify. Note that the client is not the user. (The user is the person using the client application.)
- Client ID: A unique identifier that an authorization service issues to identify a client application. The authorization service generates the client ID when the service registers the application. The authorization service uses the client ID and client Secret in subsequent API requests to ensure that the client can access an online resource.
- Client Secret: A unique code that an authorization service issues when the service registers the application. You can think of it as the password for the client application. The client Secret and the client ID enable the client to access an online resource.
- Identity Provider (IDP): A service provider that authenticates a user on behalf of another service provider.
- OpenID Connect Provider (OP): A service provider (Centrify) that implements OpenID Connect as an authentication mechanism.
- Relying party (RP): Another name for a client. This term is sometimes used in descriptions of authorization processes.
- Single Sign-On (SSO): The ability of a user to sign on (authenticate) once, then access multiple online applications without having to sign on to each of them individually.
OpenID Connect Overview
The Problem
An application that accesses protected resources on behalf of users must be able to verify that users are who they claim to be.
You could enable an application to verify users by creating a database of usernames and passwords, but using a database is unsatisfactory. It is time-consuming, it requires your users to register and remember the usernames and passwords, and it requires your client application and server to access the usernames and passwords.
The Solution
A better solution is to leverage an existing, trustworthy identity provider (IDP) that can authenticate large volumes of users, and that your users are already registered with (for example, Google). Using an IDP allows your users to log in with existing credentials that they already know and use, while keeping those user credentials secret from your application.
Centrify supports OpenID Connect, a single sign on (SSO) standard that allows you to authenticate users by using an existing IDP to provide access to applications managed through the Centrify platform. Centrify is, therefore, an OpenID Connect Provider (OP).
OpenID Connect is built upon another standard, OAuth 2.0, which was designed for granting authorization permissions to users for resources exposed over the web (for example, REST endpoints). OpenID Connect provides two layers of security: user authentication (verifying the user) and user authorization (allowing access to specific resources). OpenID Connect is also built on HTTP/JSON, is RESTful, and is compatible with both web and mobile applications.
When you develop an application with the Centrify platform, OpenID Connect allows you to leverage an IDP to authenticate users of your application. Once authenticated, your users can then access the resources (for example, applications) for which you granted authorization. Most importantly, the authorization aspect of OpenID Connect allows this authorization to be sent downstream, thus facilitating SSO for all of the applications that users are authorized to access.
Note: Although authentication and authorization are two separate security aspects, from a technical standpoint, OpenID Connect implements authentication as an OAuth 2.0 authorization request behind the scenes, whereby the authorization requests the user’s identity. This means that OpenID Connect implements authentication by making a call to the OAuth 2.0 authorization endpoint, which supplies the user’s ID token. OpenID Connect uses that ID token, in conjunction with the authorization token (access token) obtained earlier from the token endpoint, to authorize access to resources such as applications.
The End Goal
When you authenticate a user in your client application (the relying party), the result provided by an OP (for example, Centrify) includes two important tokens (encoded numbers), collectively called the Token, used to make subsequent API calls on behalf of the user:
- ID token: An ID identifying the user. This is retained by a client (for example, stored in a cookie) so that it can be used to authenticate in subsequent API calls. Storing it allows for stateless sessions.
- Access token: An ID specifying the user’s authorization permissions for resources.
You obtain the ID token and access token by using authorization flows. The authorization flow you use depends on the type of client application you are writing. OAuth 2.0, and therefore, OpenID Connect, support three authorization flows:
- Authorization Code flow: Use the Authorization (Auth) Code Flow flow for applications that can maintain the secrecy of a client secret (for example, server-side Javascript). The OpenID Provider (OP) issues a temporary authorization code in a backchannel (for example, it is not exposed to the user), once the user is authenticated. The client (the application) sends this authorization code to a token endpoint on the OP. The OP, in turn, returns the final ID and access tokens to the client (again through a back channel). Note that the application’s client secret is also sent to help ensure that only authorized client applications can request an access token.
- Implicit flow: Use the Implicit Flow flow for applications that cannot maintain the secrecy of a client secret (for example, browser-based applications). The application obtains an access token directly in an authorization request (via a redirect), over a secure communication channel, with no intermediate authorization code requested or returned.
- Hybrid flow: Use a combination of the previous two authorization flows for applications that can maintain the secrecy of a client secret, but don’t require the use of a client ID/secret.
How it Works
The following diagram illustrates the basic authentication flow. The main actors are the user, the RP (your client application that the user is accessing), and Centrify (the OP that performs as an authorization server).
In this example, a user initiates a request through your client application to start SSO. Your application redirects the user to an IDP user interface that allows the user to enter credentials. The redirection information includes your application’s client ID, client secret, and the location to go to once the user has successfully authenticated (for example, another screen on your website).
Upon successful authentication, the OP returns a temporary authorization code to your client application. This authorization code is opaque to your client application. That is, your client application cannot interpret the authorization code in any way. Because your application obtains this authorization code instead of direct client credentials, your user’s credentials are hidden from your application. Your client application then sends this temporary authorization code back to the OP. The OP then returns the Authorization Token and ID Token that your client application can use to make subsequent API calls.
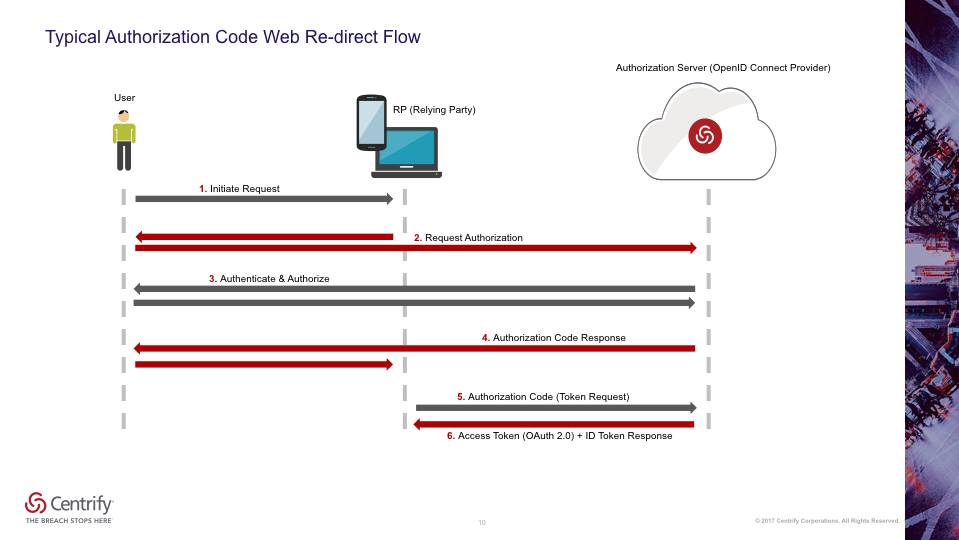
An OP (for example, Centrify) consists of, or provides, the following endpoints. An OP is, therefore, often referred to as an Authorization Server:
- Authorization endpoint: The OAuth 2.0 authorization endpoint of an IDP that provides the UI for the user to log in to. A client redirects a user to this end point to authenticate and authorize the user.
- Token endpoint: The end point that authenticates a client application and allows it to exchange an access code for the token.
- Userinfo endpoint: An endpoint that a client can use to get information about a user once authenticated. This information includes whatever information the user shares in their user configuration.
- Provider metadata: A JSON document containing the OP’s endpoint information for a tenant and the supported OpenID Connect/OAuth 2.0 features. A client application can use this to dynamically configure requests to the OP. As shown in the following example, metadata can be obtained by entering your tenant's base URL and appending it with
/.well-known/openid-configuration:
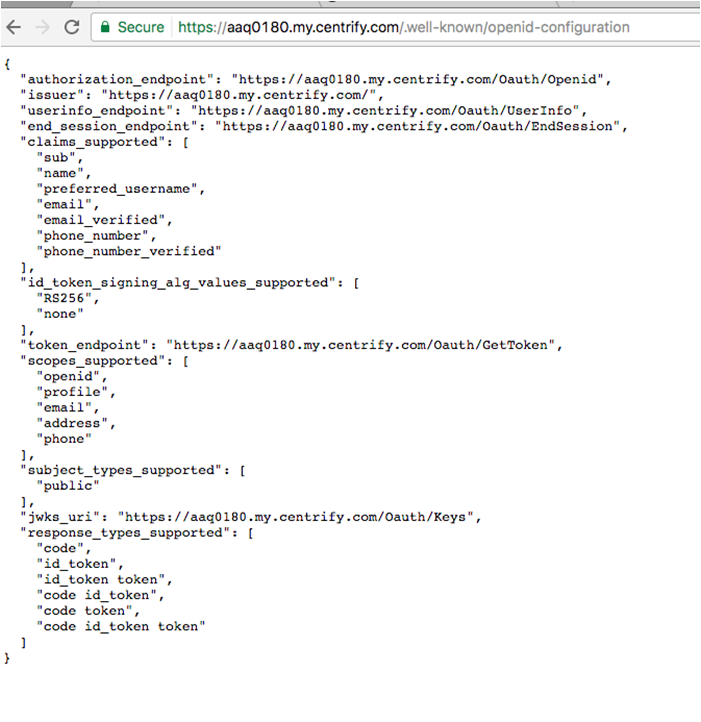
Example Request Responses
The following HTTP query parameters redirect the user to an IDP:
scopeis set toopen_id(authorization code flow) to indicate that this authorization request is requesting the user identity (for authentication purposes)client_idresponse_typeis set tocodeto indicate that the authorization code flow is to be used.
Example authentication redirection to the OP:
HTTP/1.1 302 Found
Location: https://openid.c2id.com/login?response_type=code&scope=openid&client_id=s6BhdRkqt3&state=af0ifjaldkj&redirect_url=https%3A%2F%2Fclient.example.orf%Fcb
The following request parameters are encoded in the URI query:
response_type: Set tocodeto indicate an authorization code flow.scope: The scope of the requested authorization in OAuth. The scope value openid signals a request for OpenID authentication and ID token.client_id: The client identifier of the RP at the OP. This identifier is typically obtained when the RP is registered with the OP, via the client registration API, developer console, or some other method.state: The opaque value set by the RP to maintain state between request and callback.redirect_uri: The RP callback URI for the authentication response.
Centrify also supports the optional prompt query parameter defined by OpenID Connect Core 1.0 that controls whether the authorization server prompts the end-user for reauthentication and consent. This can be set to the following values:
none:the authorization server must not display any type of authentication prompt.login:the authorization server should display an authentication prompt for reauthentication. If it cannot authenticate the user then alogin_requirederror is returned.
https://openid.c2id.com/login?response_type=code&scope=openid&client_id=s6BhdRkqt3&state=af0ifjaldkj&prompt=login&redirect_url=https%3A%2F%2Fclient.example.orf%FcbThe following figure shows the HTTP query parameters that the OP uses to redirect the user to the site that was specified in the previous call after the IDP authenticates the user. This response includes the temporary authorization code and any state information that was provided by the client in the previous API request.
The OP will then call the client redirect_uri with an authorization code (on success) or an error code (if access was denied, or some other error occurred, such as a malformed request).
HTTP/1.1 302 Found
Location: https://client.example.org/cb?code=Sp1x10BezQQybYS6WxSbIA&state=af0ifjsldkj
The RP must validate the state parameter and use the code to proceed to the next step, exchanging the code for the ID token.
The following example shows the HTTP request header and body that is sent from the client to the OP’s Token endpoint to request the token. The body includes the temporary authorization code returned from the previous API call.
POST /token HTTP/1.1
Host: openid.c2id.com
Content-Type: application/x-www-form-urlencoded
Authorization: Basic czZCaGRSa3F0MzpnWDFmQmF0M2jW


grant_type=authorization_code&code=Sp1x1OBeZQQYbYS6WxSbIA&redirect_uri=https%3A%2F%2Fclient.example.org%2Fcb
The client ID and secret are passed via the authorization header. Apart from HTTP basic authentication, OpenID Connect also permits authentication with signed JWT assertions, which do not expose the client secret with the token request, and hence offer better security.
The token request parameters are form encoded:
grant_type: set toauthorization_code.code: the code obtained from the first step.redirect_uri: repeats the callback URI from the first step.
The following example shows an HTTP response body containing the token. The token_type of bearer indicates that the client can use and have full access to that token.
On success the OP will return a JSON object with an ID token, access token, and optional refresh token:
HTTP/1.1 200 OK
Content-Type: application/json
Cache-Control: no-store
Pragma: no-cache
{
        "id_token" : "erJHbGciOasfkhawkjehkjasdladsliajwefkjaASDFAEFAWEijias..."
        "access_token" : "S1AV32hkKg"
        "token_type" : "Bearer",
        "expires_in": 3600
}
The following example shows the HTTP response body from a request the client made to the Userinfo endpoint, to request information about the user who was authenticated. The information includes previously consented user profile information, so a valid access token is required. Note that the Userinfo is JSON encoded and may optionally be packaged as a JWT that is signed or encrypted.
GET /userinfo HTTP/1.1
Host: openid.c2id.com
Authorization: Bearer S1AV32hkKG
The UserInfo is JSON encoded and may optionally be packaged as a JWT that is signed or encrypted.
HTTP/1.1 200 OK
Content-Type: application/json
{
       "sub" : "alice",
       "email" : "[email protected]",
       "email_verified" : true,
       "name" : "Alice Adams",
       "picture" : "https://c2id.com/users/alice.jpg"
}
Server Side Configuration
To make this all work, you must configure your client application on the OP. Some elements (for example, client ID and secret) must match in the server-side and client-side configurations.
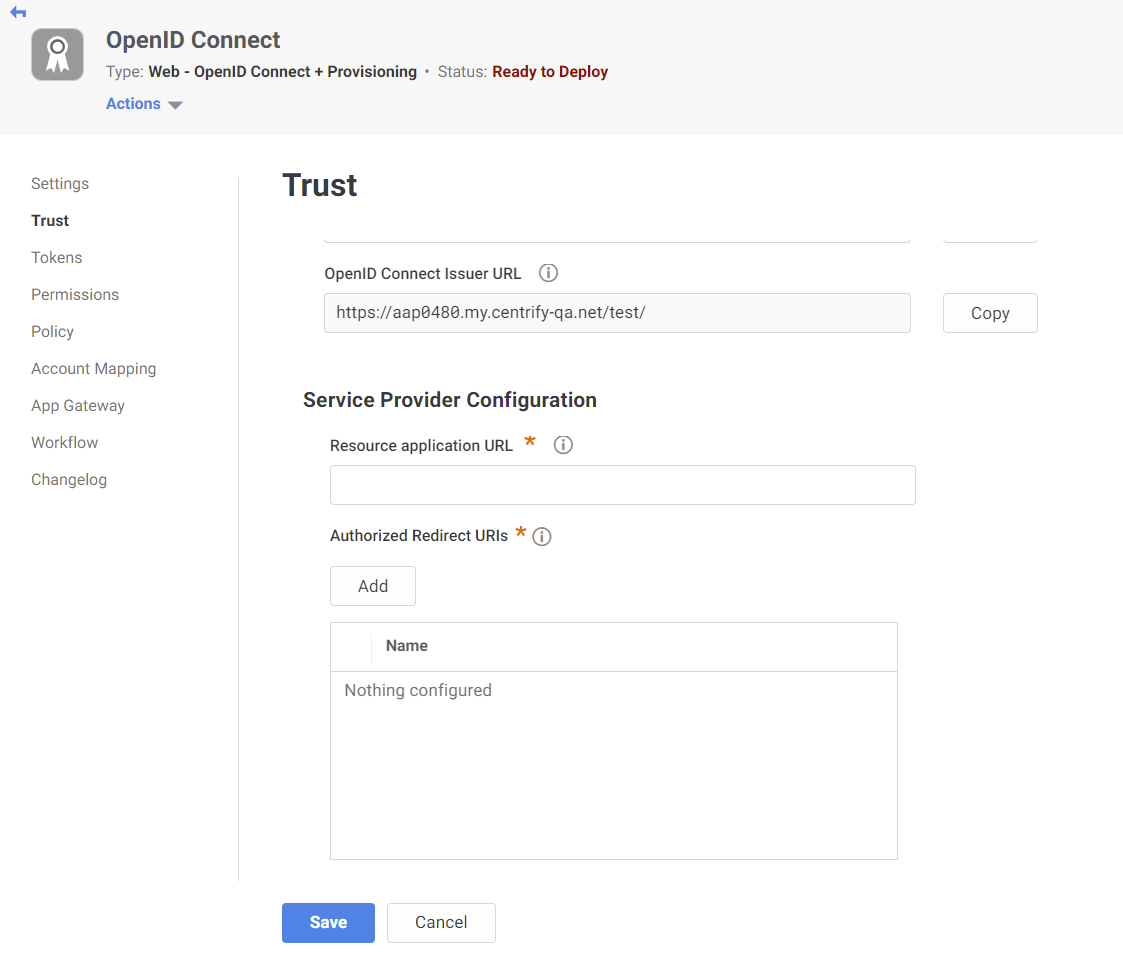
The following image shows the Centrify Dashboard, where you configure a client application. The Resource application URL field specifies the URL where the user logs in. The Authorized Redirect URLs field specifies the location to redirect the user to, once the user is authenticated. The Identity Provider Info fields specify the application’s auto-generated client ID, metadata URL, and Issuer URL. The client secret must be manually entered into these fields.
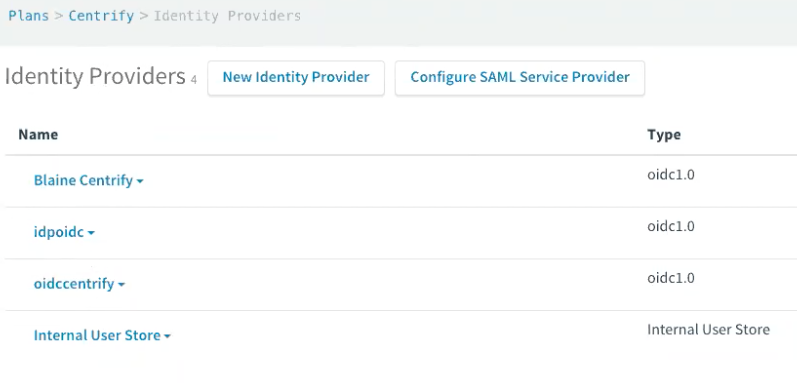
The following figure shows a list of IDPs configured on Centrify. You can configure a new IDP from this screen, and you can edit existing IDP configurations.
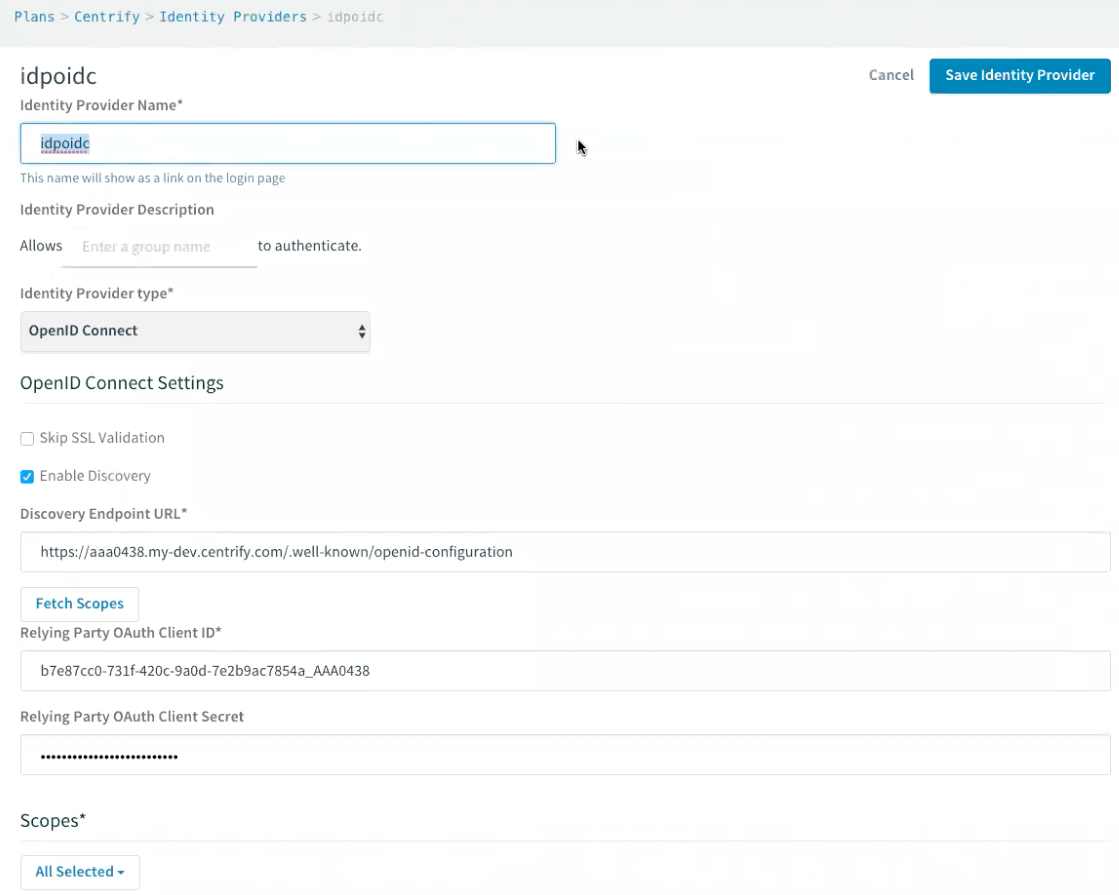
The following figure shows the editing of an IDP configuration for an RP. Set the Identity Provider Type to OpenID Connect to use OpenID Connect authentication. Select Enable Discovery to make the IDP pull all OP information from the provider metadata endpoint. Use the Relying Party OAuth Client ID and Relying Party OAuth Client Secret fields to authenticate the client application itself with the IDP.
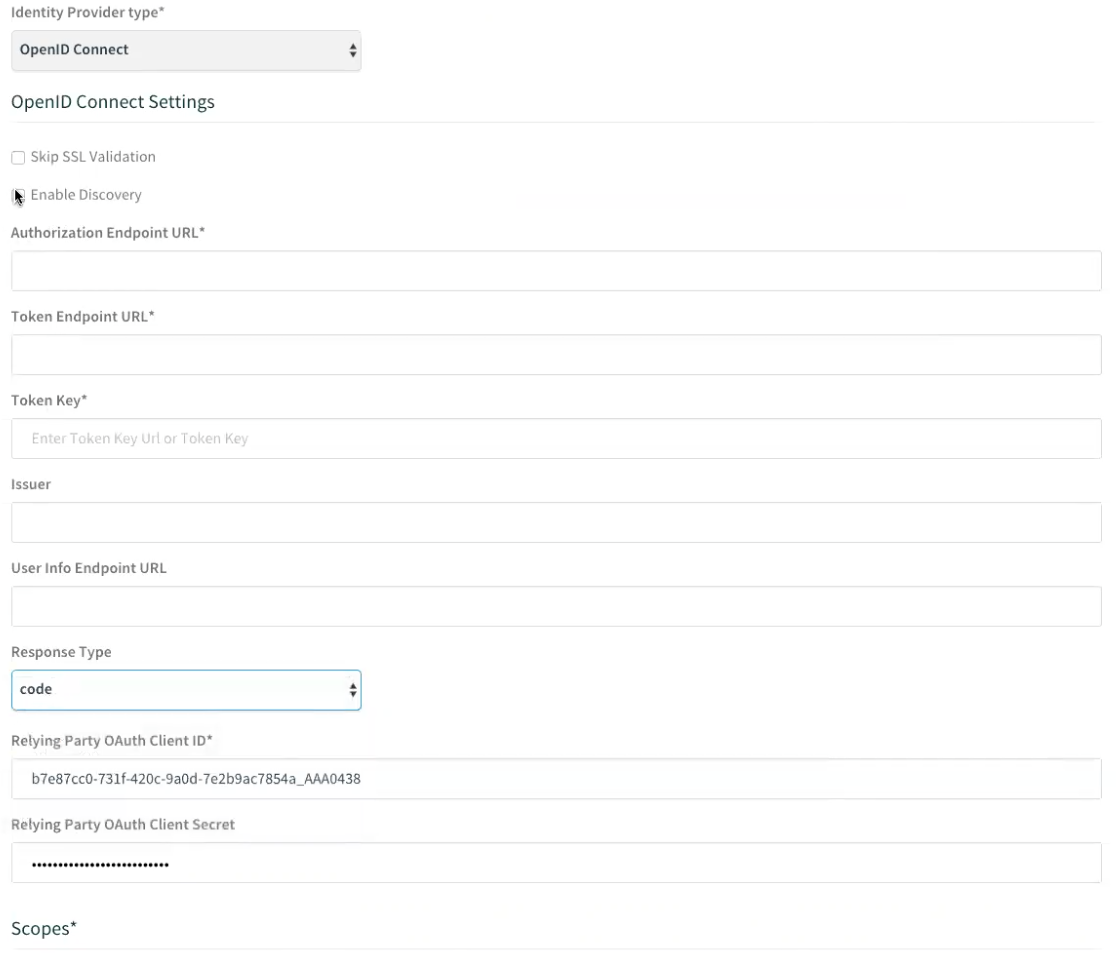
If you disable Enable Discovery, you must manually enter all of the OP information in the fields shown in the following figure:
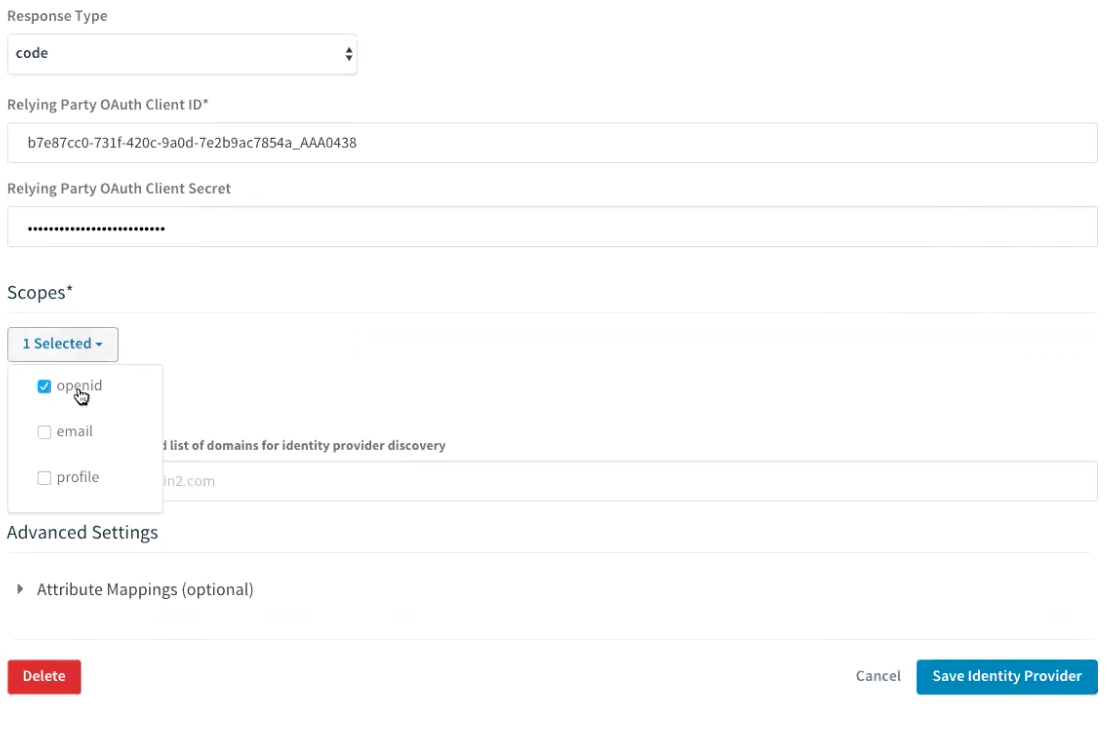
Select the Scope, which must include openid. This corresponds to the scope that the RP sends to the OP when it starts the authentication process, as mentioned above. You can optionally select additional scope as well to provide other types of information.
Additional Resources
Updated 3 months ago
