Use Extensible Attributes
This page describes how to add/update additional (extensible) user attributes using both the Admin Portal and the API.
Adding or updating an extensible user attribute involves two steps:
Step 1: Adding the attribute to the tenant schema or editing/updating an existing attribute in the schema.
Step 2: Updating the value of the new or edited attribute for each user.
You can add and update extensible user attributes and their values using either the Admin Portal or programmatically using the API.
Adding Attributes to the Tenant's Schema via the Admin Portal
Step 1. Add an attribute to the tenant schema
- Log in to the Admin Portal.
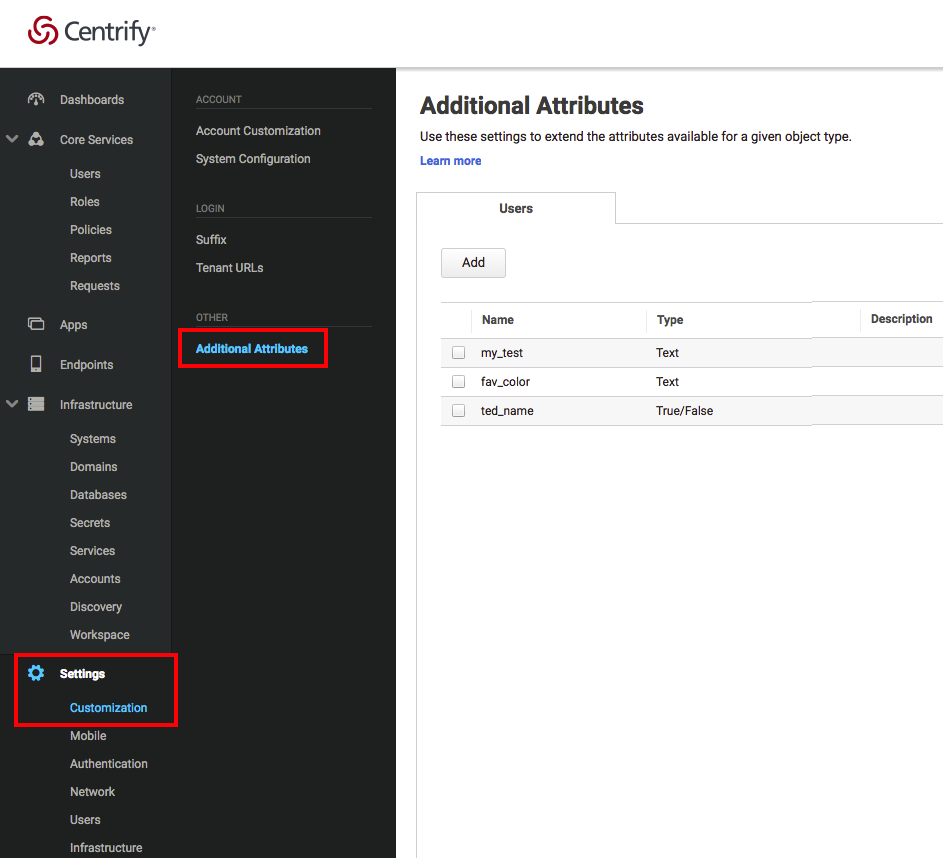
- Navigate to Settings > Customization > Additional Attributes:
- Click the Add button.

- In the Additional Attribute popup, enter the Name, Type, and Description (optional).
- Click the Add button.
OR: Edit/Update an existing tenant schema attribute
- Log in to the Admin Portal.
- Select Settings > Customization > Additional Attributes.
- In the list, select the attribute to edit.
- In the Additional Attribute popup, update the fields as required.
- Click Modify.
Step 2. Update the attribute value for a user
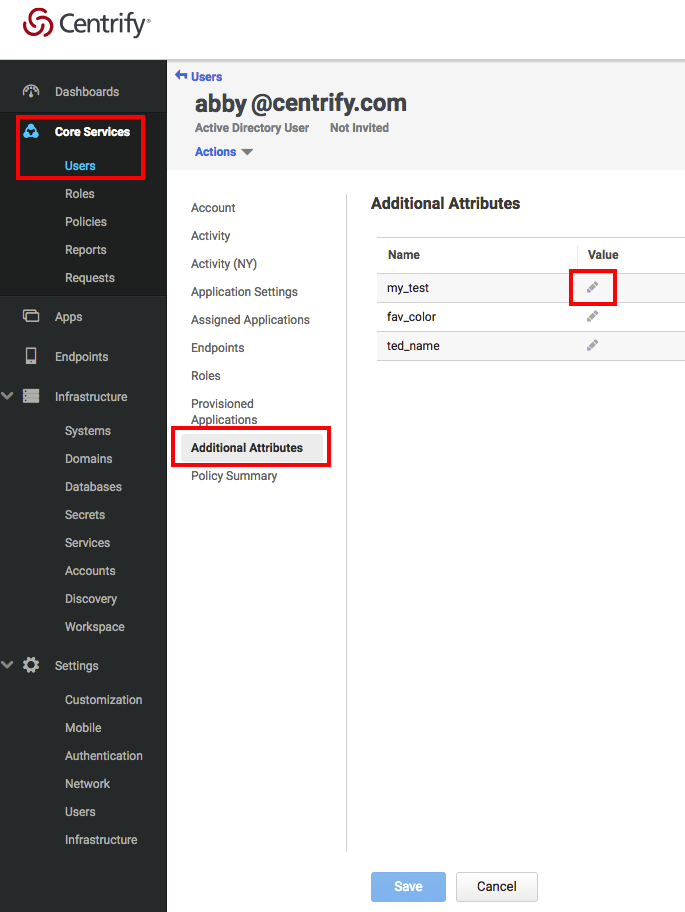
- Navigate to Core Services > Users.
- Click on the user in the list whose attribute is to be modified.
- Click Additional Attributes.
- Click the pencil icon in the Value column.
- In the value field, enter a new value.

- Click Save at the bottom of the screen.
Adding or updating a user attribute using the API
Step 1. Add an attribute to the tenant schema
- Obtain a list of the current attributes in the Tenant's extended schema using
/ExtData/GetSchema. This is necessary because all existing attributes must be included when adding/updating the Tenant schema in the next step.
POST /ExtData/GetSchema
{
	"Table":"users"
}
/ExtData/GetSchema response:
{
	"success":true,
	"Result":{
		"ColumnLimit":10,
		"Columns":
			[
				{
					"Title":null,
					"Name":"CustomAtt_1",
					"Description":"Custom1",
					"Type":"Text"
				}
			]
		},
		"Message":null,
		"MessageID":null,
		"Exception":null,
		"ErrorID":null,
		"ErrorCode":null,
		"InnerExceptions":null
}- Update the Tenant Schema to add the attribute using
/ExtData/UpdateSchema:
POST /ExtData/UpdateSchema
{
	“Table”:”users”,
	”Columns”:
	{
		“CustomAtt_1”:
		{
			“Type”:”Text”,
			”Title”:”ColumnTitle”,
			”Description”:”ColumnDescription”
		},
		“CustomAtt_2”:
		{
			“Type”:”Text”,
			”Title”:”ColumnTitle”,
			”Description”:”ColumnDescription”
		}
	}
}
Notes:
- The JSON in the request body must include all current attributes that are in the schema plus the new attribute.
- To add multiple attributes to an empty schema, add them all to the list and make the update call.
- To add a single attribute to a schema that already has attributes, use the GetSchema endpoint to get a list of attributes currently in the schema, add the new attribute to the list, and then call UpdateSchema with the updated full list.
/ExtData/UpdateSchema response:
{
	"success":true,
	"Result":null,
	"Message":null,
	"MessageID":null,
	"Exception":null,
	"ErrorID":null,
	"ErrorCode":null,
	"InnerExceptions":null
}
Step 2. Update an attribute value for a user
- Obtain a list of current attributes and values for a user using /ExtData/GetColumns:
POST /ExtData/GetColumns
{
	"Table":"users",
	"ID":"0d2c9b91-d837-4209-ab02-67be57ce43d1"
}
Note: ID represents the Centrify user ID for the target user. This can be found by doing a Redrock (SQL) query on the Users table by username or email (Select ID from User where Username = ‘username@domain’ or Select ID from User where Email = ‘emailAddress’). See Use Queries for documentation on using Redrock queries via API.
/ExtData/GetColumns response:
{
	"success":true,
	"Result":
	{
		"CustomAtt_1":"NewValue",
		”CustomAtt_2":"NewValue2”
	},
	"Message":null,
	"MessageID":null,
	"Exception":null,
	"ErrorID":null,
	"ErrorCode":null,
	"InnerExceptions":null
}
Note: Extended attributes that are unset (i.e. null values) for the user in the GetColumns request are not returned in the response.
- Update the values
POST /ExtData/SetColumns
{
	"Table":"users",
	"ID":"0d2c9b91-d837-4209-ab02-67be57ce43d1",
	"Columns":
	{
		"CustomAtt_1":"NewValue",
		"CustomAtt_2":"NewValue2"
	}
}
/ExtData/SetColumns response:
{
	"success":true,
	"Result":null,
	"Message":null,
	"MessageID":null,
	"Exception":null,
	"ErrorID":null,
	"ErrorCode":null,
	"InnerExceptions":null
}
Adding or updating only a single user attribute using the API
The instructions below provide an alternative method if you are adding only a single attribute.
Step 1. Add an attribute to the tenant schema
Follow the same instructions as in the previous section.
Step 2. Update the value of a single attribute for a user
- Obtain a single attribute for a user using /ExtData/GetColumn:
POST /ExtData/GetColumn
{
	"Table":"users",
	"ID":"0d2c9b91-d837-4209-ab02-67be57ce43d1",
	“Column”:”CustomAtt_1”
}
/ExtData/GetColumn response:
{
	"success":true,
	"Result":ColumnValue,
	"Message":null,
	"MessageID":null,
	"Exception":null,
	"ErrorID":null,
	"ErrorCode":null,
	"InnerExceptions":null
}- Update the value using /ExtData/SetColumn:
POST /ExtData/SetColumn
{
	"Table":"users",
	"ID":"0d2c9b91-d837-4209-ab02-67be57ce43d1",
	“Column”:”CustomAtt_1”,
	“Value”:”Newvalue1”
}
/ExtData/SetColumn response:
{
	"success":true,
	"Result":null,
	"Message":null,
	"MessageID":null,
	"Exception":null,
	"ErrorID":null,
	"ErrorCode":null,
	"InnerExceptions":null
}
Updated 3 months ago
