Using Postman
Overview
Postman is a visually rich application that you can use to become familiar with the Centrify REST API. With Postman, you compose an API request by selecting and enter the parts of the request, such as the URI, headers, and body. When you’ve finished composing the request, you click a button to send it to the API. Within moments, Postman displays the API response. You can use this process to examine Centrify’s REST API endpoints without coding. Postman is an excellent alternative to using command line tools for this purpose.
The following sections introduce you to the Postman user interface and show you how to execute Centrify API endpoints. When you’re done, you will be able to use Postman to start the authentication process, handle multi-factor authentication challenges, and invoke any Centrify API on behalf of an authenticated user.
Explore the Postman User Interface
You can see the main elements of the Postman UI below:

- URI Entry Field: Use this field to enter the URI for the endpoint. Use the list to the left of this field to specify the HTTP method (for example, POST).
- Request Payload: Use this field to specify the elements of the request to send. Use the tabs above this field to select the part of the request you want to enter. The screenshot above shows the Body tab selected and the body of the request that will be sent. Click other tabs to explore them. For example, the Headers tab enables you to enter a payload element.
- Send: Clicking this button sends the request.
- Response: This field displays the server’s response to the request.
- Save: Click this button to save the current request to a named collection of requests. By default, Save uses the URI of the request as the name of the request. However, you can edit the name, add a description, and select or create the collection to which the request should belong.
- Collections: This is where you find the collections you create when you save requests.
- New Tabs: Opens additional tabs for editing requests. The descriptive name of the request is shown both in the tab and just above the request.
Start the Authentication Process
To start the authentication process, invoke the /Security/StartAuthentication endpoint. Invoking this endpoint starts the authentication process for a user and returns the challenges to which the user must respond.
To execute /Security/StartAuthentication:
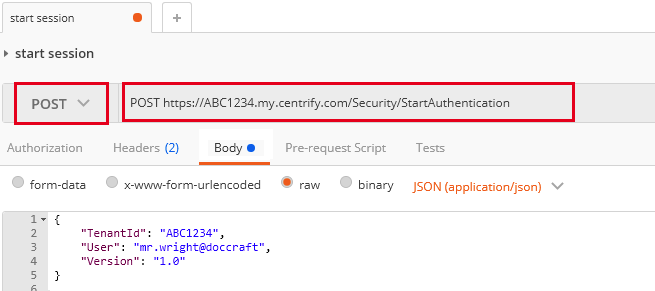
- Select POST.
- Enter the base URI of the tenant, which must begin with https://. Append
/Security/StartAuthenticationto the URI.
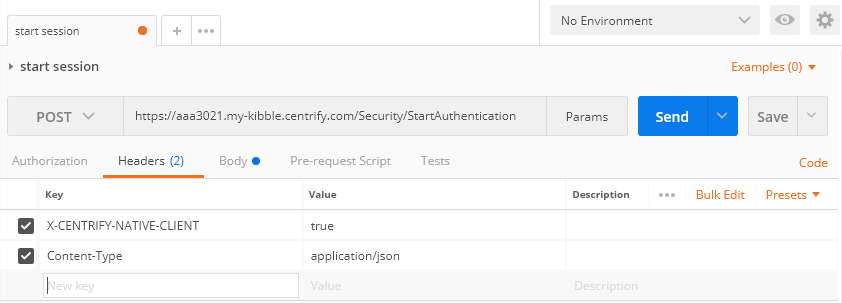
- Select the Header tab under the URI and enter the following key/value pairs:
X-CENTRIFY-NATIVE-CLIENT:true, which indicates that an application is invoking the Centrify endpoint.Content-Type: application/json, which indicates that the body is in JSON format.
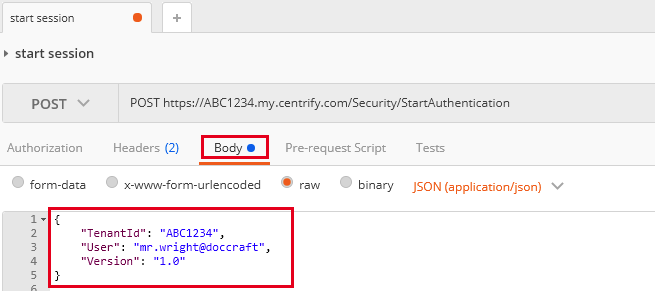
- Select the Body tab under the URI to display the body entry field. Select the raw option so that you can enter plain text.
- Enter the JSON body required by
/Security/StartAuthentication. Include theTenantID,User, andAPI Versionvalues.
{
"TenantId": "ABC1234",
"User": "mr.wright@doccraft",
"Version": "1.0"
}
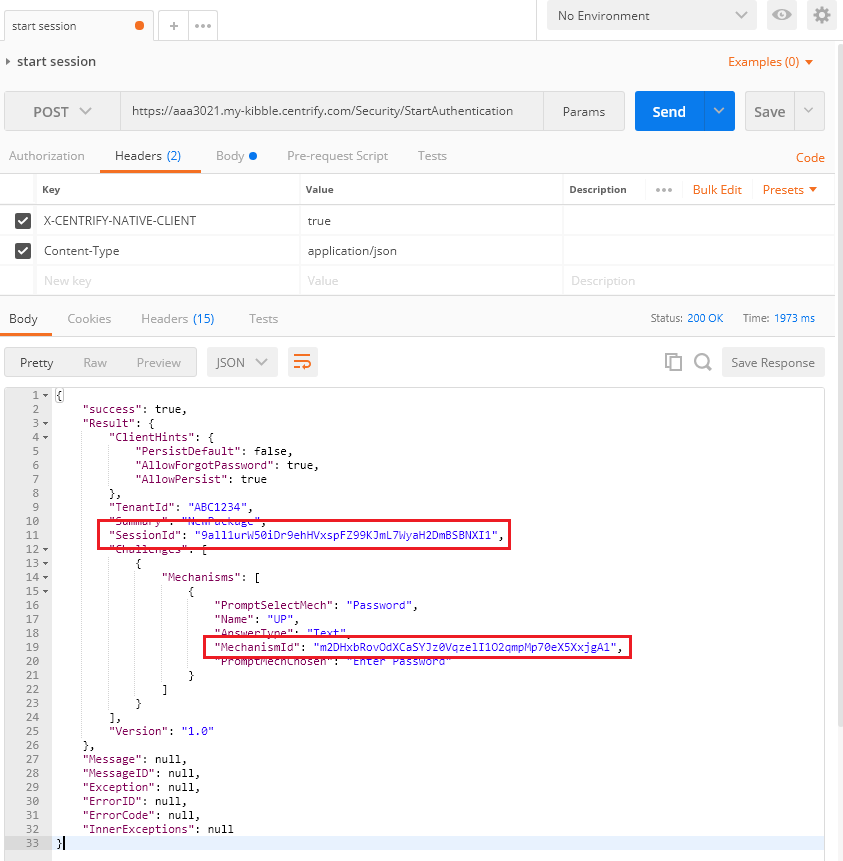
- Click Send to invoke the endpoint.
Copy the values returned in theSessionIdandMechanismIdfields. Use them as shown below when invoking/Security/AdvanceAuthentication:
Complete the Authentication Process
After you receive the server response from /Security/StartAuthentication and collect the user’s responses to the specified security challenges, call the /Security/AdvanceAuthentication endpoint. Calling this endpoint forwards the user’s responses to the challenges to Centrify for verification.
To execute /Security/AdvanceAuthentication:
- Click + to open a new tab. Enter the new
/Security/AdvanceAuthenticationrequest in the new tab. - Select POST in the request type list.
- Enter your tenant’s URL and append
/Security/AdvanceAuthentication. - Select the Header tab under the URI and enter the following key/value pairs:
X-CENTRIFY-NATIVE-CLIENT:trueContent-Type: application/json
- Select the Body tab under the URI to display the body entry field.
- Select the raw option so you can enter plain text.
- Enter your
TenantID,SessionId, andMechanismId(returned earlier by/Security/StartAuthentication). - To submit the user’s password, include "Action": "Answer" (to indicate that you are sending a password), and follow it with "Answer": "<Your Password>", as shown below:
Content-Type: application/json
{
        "TenantId": "ABC1234",
        "SessionId": "1e5214e4-0921-4e9e-8ada-3ef2970f7c1f",
        "MechanismId": "4a23390d-dee9-4ead-aa33-2bacd93f81fa",
        "Action": "Answer",
        "Answer": "Pass1234"
}- Click Send to invoke the endpoint.
- If additional challenges (such as a text message response) were indicated in the server response to your earlier
/Security/StartAuthenticationcall, repeat the previous steps. - Once you have submitted the call to
/Security/AdvanceAuthentication, an authorization token cookie is returned and stored by Postman for use in subsequent API calls to tell Centrify that the client app is invoking a call on behalf of an authenticated user.
Invoke Subsequent Endpoints
Now that you have retrieved the authentication token from the response returned by /Security/AdvanceAuthentication, you must use that token when you invoke other Centrify endpoints. The following example shows you how to invoke /UPRest/GetUPData to obtain a list of applications available to the user, and how to invoke /CDirectoryService/CreateUser to create a new user in the cloud directory.
To execute /UPRest/GetUPData:
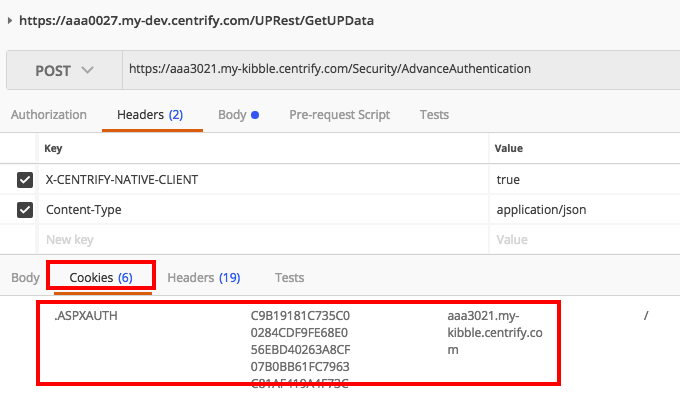
- Click
Cookiesin the response section. This will verify that the response from/Security/AdvanceAuthenticationcontains an .ASPXAUTH cookie for your tenant. You must have this cookie before you can execute subsequent calls in Postman on behalf of the user you just authenticated:
- Click + to open a new tab. Enter the new
/UPRest/GetUPDatarequest in this new tab.

- Select POST in the request type list.
- Enter your tenant’s URL and append
/UPRest/GetUPData. - Select the Header tab and enter the following key/value pairs:
X-CENTRIFY-NATIVE-CLIENT:trueContent-Type: application/json

- Select the Body tab under the URI to display the body entry field. Select the raw option and enter the endpoint’s parameters so the body looks similar to this example:
{
	"username": "mr.wright@doccraft",
	"force": true
}- Click Send to invoke the endpoint and observe the response from Centrify:
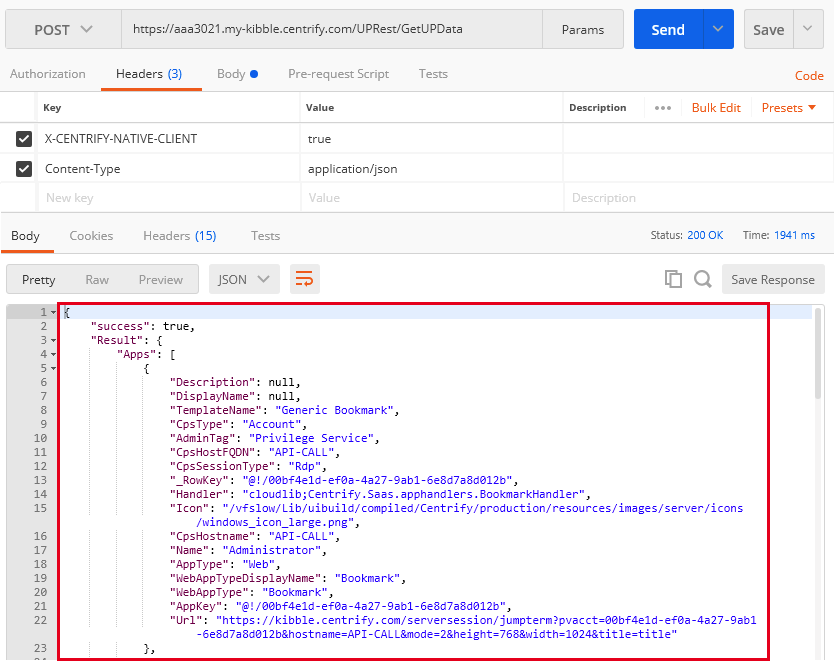
To execute /CDirectoryService/CreateUser:
- Click + to open a new tab. Enter the new
/CDirectoryService/CreateUserrequest in this new tab. - Select POST in the request type list.
- Enter your tenant’s URL and append
/CDirectoryService/CreateUser. - Select the Header tab under the URI to display the list of headers, and enter the following key/value pairs:
X-CENTRIFY-NATIVE-CLIENT:trueContent-Type: application/json
- Select the Body tab under the URI to display the body entry field. Select the raw option is selected so that you can enter plain text and enter the endpoint’s parameters similar to the following example:
{
	"Name": "[email protected]",
	"Password": "Test1234",
	"OfficeNumber": "123-124-1234",
	"Mail": "[email protected]"
}- Click Send to invoke the endpoint. The JSON returned from Centrify is shown in the response area which includes in the UUID of the newly created user in the Result field:

Using our Sample Postman Collection
The Postman Link
Throughout the documentation, we've included a Run in Postman button that downloads a sample Postman collection that you can use as a starting point for experimenting with many of our endpoints:
Note: If you don't already have Postman installed, you can get it from https://www.getpostman.com/.
Launching Postman and Importing the Collection
Upon clicking the button, the following screen will prompt you to open the collection in the Postman application that you have installed:
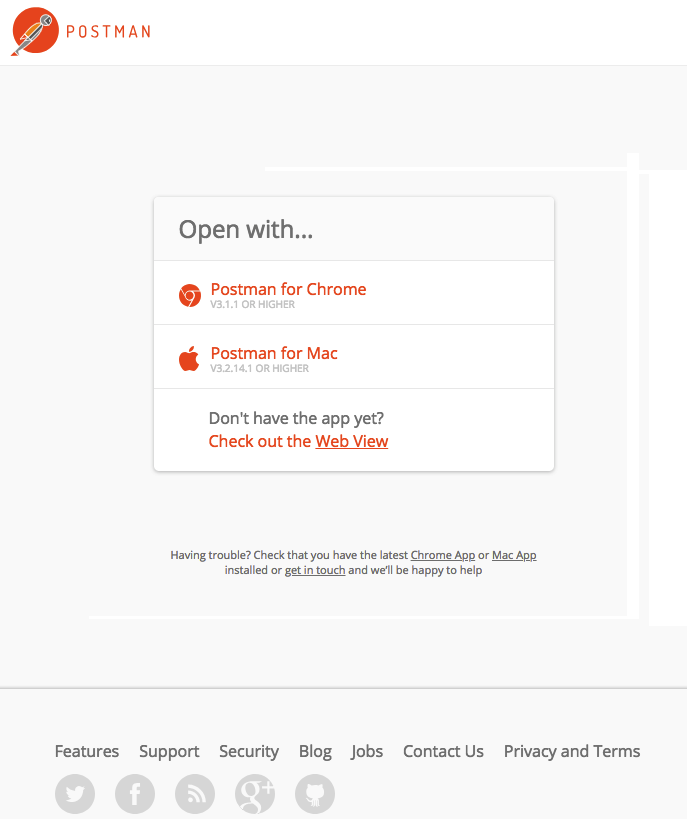
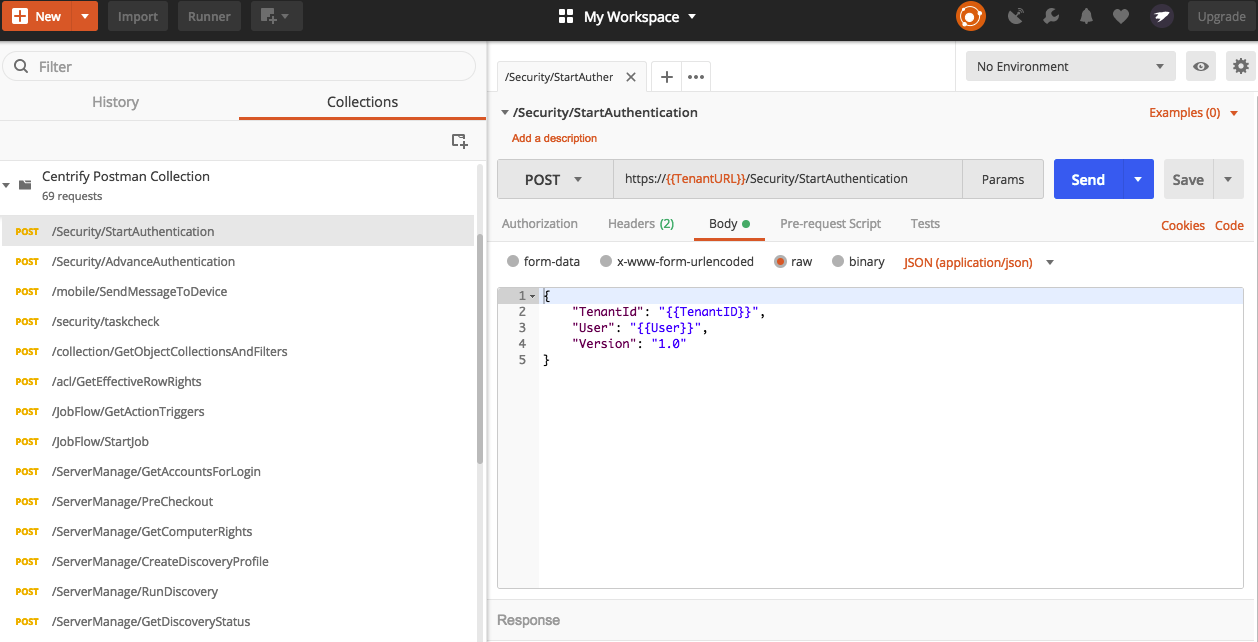
Select the appropriate application. Postman will launch and automatically import the Centrify collection:
Edit the Collection's Variables
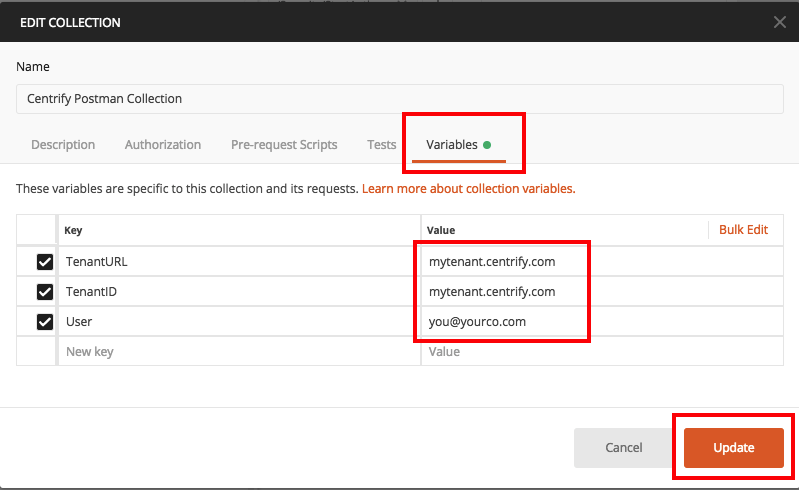
The collection contains the following variables which you must modify before using any its endpoints:
- TenantURL: the base URL of your tenant. Used in the URI for each endpoint in the collection.
- TenantID: the ID of the tenant passed in to /Security/StartAuthentication.
- User: the username to authenticate with.
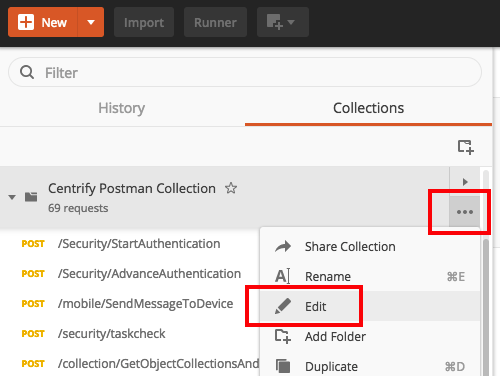
To modify these variables, select the collection, click ..., and select Edit:
On the Edit Collection popup that appears, select the Variables tab, edit the values for the variables, and click Update:
Authenticating and Invoking Endpoints with the Collection
The first two endpoints in the collection are (/Security/StartAuthentication and /Security/AdvanceAuthentication). These are provided so that you can obtain an access token for use in subsequent endpoint calls.
After invoking StartAuthentication, copy the SessionID and MechanismID from the response and paste them into the appropriate body fields of the /Security/AdvanceAuthentication endpoint request. After the authentication process has been completed, copy the access token returned from /Security/AdvanceAuthentication.
To use the authentication token, select a subsequent endpoint to invoke, navigate to the Headers tab, locate the Authorization header row, and replace AuthorizationToken in the value column with the access token obtained:
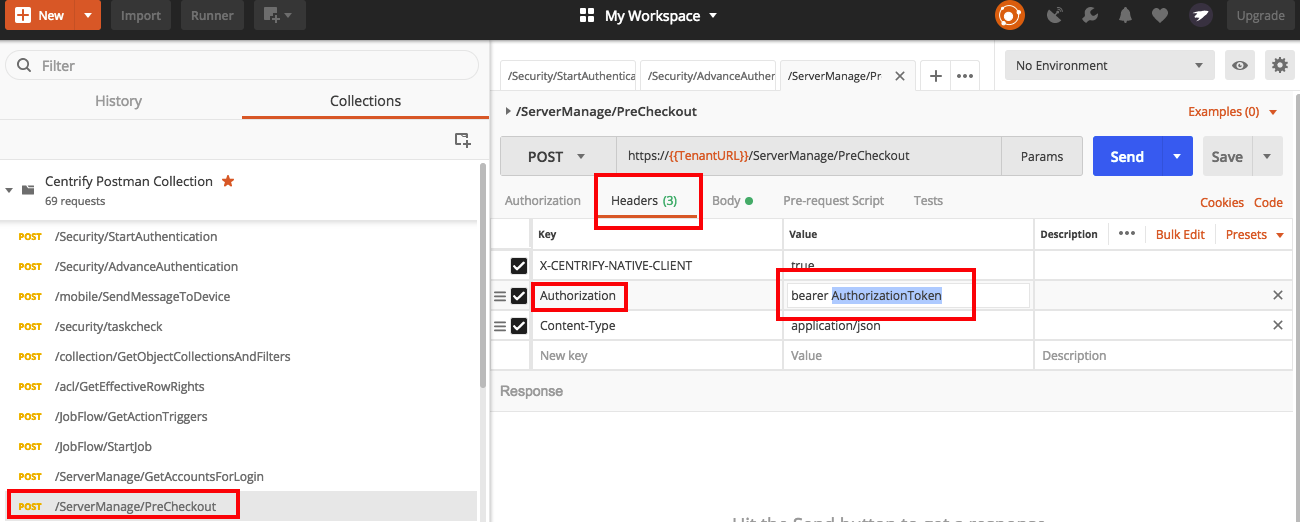
You can now invoke this endpoint from the collection.
Automated Testing of the Collection from the Command Line
You can use the Newman command line utility to automatically run tests on a Postman collection from the command line. This can be useful for running automated tests of the Centrify Postman Collection from a build or deployment system. See here for additional information about Newman.
Enter the following in Terminal to install Newman:
$ npm install -g newmanTest the collection using the following command:
$ newman run Centrify.postman_collection.jsonThe output will look similar to the following:
newman

Centrify

→ /security/startauthentication
  POST https://yourtenant.centrify.com/security/startauthentication/ [200 OK, 1.22KB, 961ms]

→ https://yourtenant.centrify.com/Security/StartAuthentication
  POST https://yourtenant.centrify.com/Security/StartAuthentication [200 OK, 1.25KB, 182ms]

→ https://yourtenant.centrify.com/security/advanceauthentication OOB
  POST https://yourtenant.centrify.com/Security/AdvanceAuthentication [200 OK, 1.12KB, 2s]

→ https://yourtenant.centrify.com/security/logout
  POST https://yourtenant.centrify.com/Security/AdvanceAuthentication [200 OK, 1.14KB, 289ms]
  ...
Updated 4 months ago
