Advancing the Authentication
Advancing the Authentication to Obtain a Token
After your client receives the Challenges and Mechanisms and presents the user interface, the user enters credentials and indicates readiness to advance by clicking a login button.
Your client must then advance the authentication process, meaning it must retrieve the credentials entered by the user in response to the challenge and send those credentials to the server for authentication. The client application does this by invoking the /Security/AdvanceAuthentication endpoint.
The body of the request that your client sends must include the TenantId, which identifies the Tenant, the SessionId returned from /Security/StartAuthentication, which identifies the web communications sessions, and the MechanismId returned from /Security/StartAuthentication. The server uses the MechanismId to look up the challenge type and determine the result to expect when that user authenticates against the tenant identified by the TenantId. For some types of challenges, you must include additional fields in the client’s request.
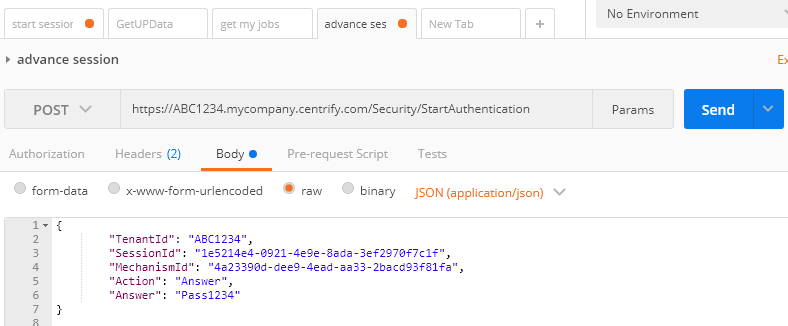
The example below shows a client’s request to advance authentication for a password mechanism. The Action element specifies that Answer is to be used for authentication. That means the user must enter a password. The Answer element must contain the password that the user entered in the UI.
POST https://ABC1234.mycompany.centrify.com/Security/AdvanceAuthentication

X-CENTRIFY-NATIVE-CLIENT:true
Content-Type: application/json
{
        "TenantId": "ABC1234",
        "SessionId": "1e5214e4-0921-4e9e-8ada-3ef2970f7c1f",
        "MechanismId": "4a23390d-dee9-4ead-aa33-2bacd93f81fa",
        "Action": "Answer",
        "Answer": "Pass1234"
}
To execute this request in Postman:
- Select the POST request type in the list and enter the endpoint URI.
- Select the Headers tab and enter each header on a separate line.
- Select the Body tab and enter the JSON:

- Click Send to execute the request.
Upon receiving this request from your client, the server performs the authentication. If the authentication is successful, the server returns a response containing a success field indicating true and a Result element containing information about the user.
{
   "success": true,
   "Result":
   {
     "AuthLevel": "Normal",
     "DisplayName": "MRWright",
     "Auth": "6936714B84F54...",
     "EmailAddress": "[email protected]",
     "UserDirectory": "CDS",
     "PodFqdn": "abc1234.my-dev.centrify.com",
     "User": "mr.wright@doccraft",
     "CustomerID": "ABC1234",
     "SystemID": "ABC1234",
     "SourceDsType": "CDS",
     "Summary": "LoginSuccess"

   },  "Message": null, "MessageID": null, "Exception": null,  "ErrorID": null, "ErrorCode": null, "InnerExceptions": null
}
Invoking a Subsequent Endpoint using the Authentication (ASPXAUTH) Token
The most important element of a successful response to /SecurityAdvanceAuthentication is the .ASPXAUTH cookie, which contains an authentication token. The server generates this unique code, and your client application must store it. The token is used to grant the client authenticated access to resources (Centrify endpoints) on behalf of the user. That is, the token provides the server with proof that each subsequent API call is being made on behalf of a user who has already been authenticated. In web applications, including Postman, the browser might retain this code as a cookie and automatically pass it along to the server.
If your calls are being invoked by server code you must manually pass the token as a Bearer token. Create a new header in the web request for the next API call, called Authorization and set its value to ‘Bearer <valueOfAspxAuth>’.
Consider the following example, where the client has received the authentication token. The client then invokes the /UPRest/GetUPData endpoint to obtain a list of applications that are deployed for the authenticated user.
POST https://ABC1234.mycompany.centrify.com/UPRest/GetUPData

X-CENTRIFY-NATIVE-CLIENT:true
Content-Type: application/json
Authorization: Bearer 6936714B84F54...

{
        "Username": "mr.wright@doccraft"
}
In this example, the client includes the ASPXAUTH cookie in header called Authorization.
With this information, the client can invoke this request on behalf of the user.
To execute this request in Postman:
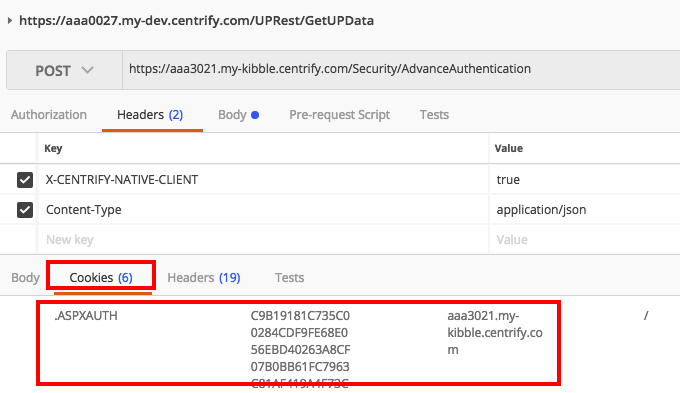
- Click Cookies in the response section to verify that the response from
/Security/AdvanceAuthenticationcontains an.ASPXAUTHcookie for your tenant. You must have this cookie before you can execute subsequent calls in Postman on behalf of the user you just authenticated:

- Select the POST request type in the list and enter the endpoint URL:

- Select the Headers tab and enter each header on a separate line.

- Select the Body tab and enter the JSON.
- Click Send to execute the request.
Invoking a Subsequent Endpoint using the Authentication (ASPXAUTH) Token
The most important element of a successful response to /SecurityAdvanceAuthentication is the .ASPXAUTH cookie, which contains an authentication token. The server generates this unique code, and your client application must store it. The token is used to grant the client authenticated access to resources (Centrify endpoints) on behalf of the user. That is, the token provides the server with proof that each subsequent API call is being made on behalf of a user who has already been authenticated. For more information about the ASPXAUTH token see Using the Authentication Token.
Try the API in Postman:
.
Click here for help with using our sample Postman collection.
Updated 4 months ago
