Implicit Flow
Introduction
This page describes how to implement the Implicity Code Flow in Centrify. For an overview of this flow see OAuth Clients.
Overview
Six steps are required to enable your client applications to use OAuth 2.0 when accessing Centrify endpoints:
Step 1: Create a New OAuth App in the Admin Portal
Step 2: Configure the newly created OAuth 2.0 Client.
Step 3: (Optional) Set up Tokens.
Step 4: (Optional) Create Scopes.
Step 5: Create a Confidential Client.
Step 6. Verify Role Access.
Step 7. Develop a Client.
Enabling a Client Application Access to Centrify
The steps below are to be used for web applications that require OAuth2 authentication but are not in the Application Catalog.
Step 1: Create a New OAuth App in the Admin Portal
The first step in enabling your client applications to use OAuth 2 when accessing Centrify endpoints, is to create a new OAuth Client on the Admin Portal:
- Log in to your tenant.
- Navigate to your user name at the top right corner and select Switch to Admin Portal from the dropdown:
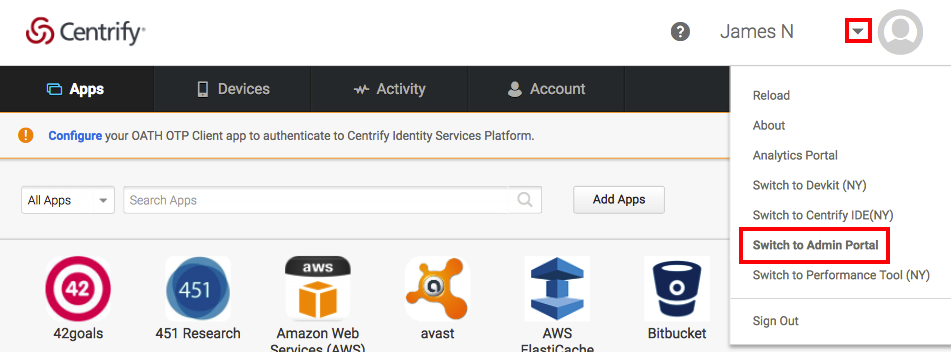
- Click Skip on the Quickstart splash screen if it appears.
- Click Apps in the Dashboard.
- Click Add Web Apps and select the Custom tab on the Add Web Apps popup.
- Locate OAuth2 Client in the list and click Add. This creates an OAuth2 Client for use with the Centrify APIs.
- Click Yes on the Add Web App popup that appears.
- Click Close on the Add Web Apps popup. The app configuration screen is displayed.
Step 2. Configure the new OAuth 2.0 Client
- In the app configuration screen (left side), select categories (listed below).
- For each category, enter the appropriate data in the fields.
- Click Save.
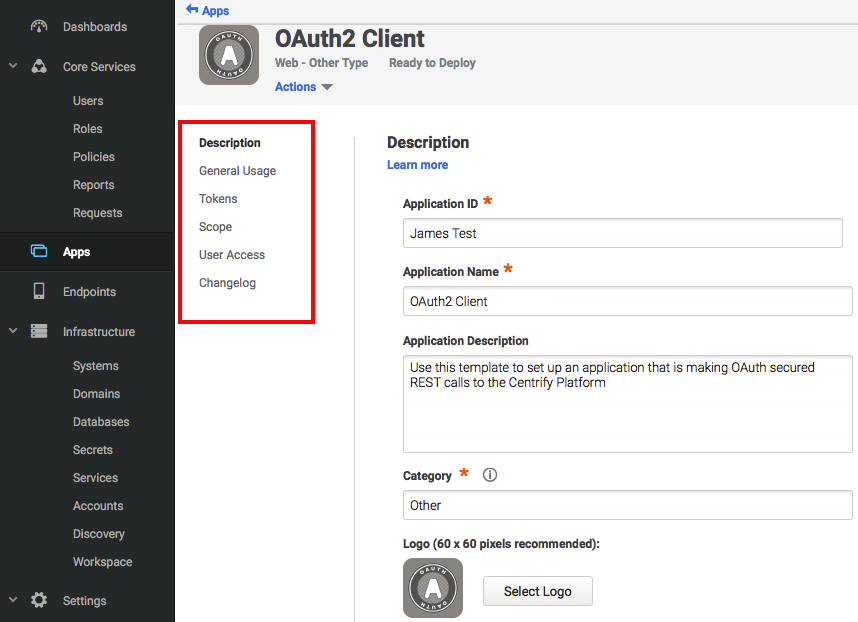
Note: You can create multiple OAuth 2.0 clients on the Admin Portal and configure each of them differently to serve different clients. For example, you can configure the supported OAuth 2.0 flows and scopes differently.
Description:
- Application ID: the tenant portion of the URL for OAuth endpoints. Note that this value cannot contain spaces.
- Application Name: a descriptive name for the application.
- Application Description: a description of the application (not seen by users).
- Category: the default grouping for the app on the Admin Portal.
General Usage: specifies the types of credentials that can be used to authorize with this client.
- Client ID Type: For implicit flow, set this to Confidential and enable Confidential client is a Centrify Directory Service user.
Issuer: the URL of the server issuing access tokens. Can be left as default.
Allow Redirects: specifies the redirects that should be trusted when redirection occurs during an Implicit flow.
Tokens:
- Token Type: specifies the type of token to issue (JwtRS256 or opaque). JwtRS256 is a JSON Web Token (JWT) composed of Base64-encoded user and claim information. An opaque token contains no information about the user. To obtain user and claim information for an opaque token an introspection URL must be used by passing the token.
- Auth Methods: specifies the authentication flow(s) for which the specified token type should be issued. Set to Implicit.
- Token Lifetime: specifies the duration of the token's lifespan.
- Issue refresh tokens: not applicable for implicit flow.
Scope:
- User must confirm authorization request: when enabled, this setting requires that the client display a popup where the user must select and approve the scope(s) to allow for the client.
- Scope Definitions: allows one or more scopes to be specified for authorization by the client. Scopes must first be defined through the scope configuration screen as described here.
For more information see Create Scopes below.
User Access: specifies the role(s) that the user must be in, in order to authorize.
Changelog: lists changes made to the client.
Step 3. Set up Tokens
- Navigate to Apps and select the application to set the token for.
- Click on Token:
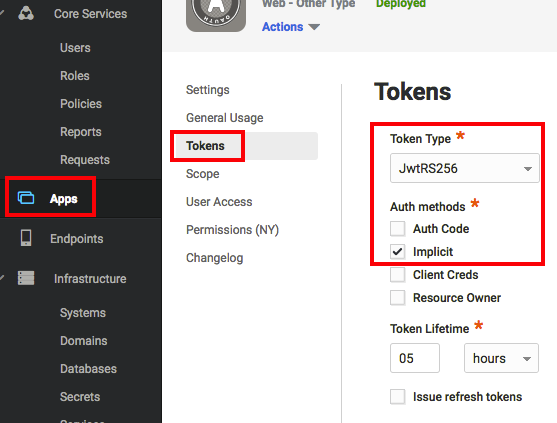
- Select a token type from the Token Type dropdown.
- Set the Auth Methods field to Implicit.
- (Optional) Configure the Token Lifetime.
Step 4. Create Scopes
A scope is a named entity which defines the endpoint(s) that a client may access. Scopes are used in flows where the user is prompted to grant scope authorization, as well as for confidential clients where there is no popup for the user to approve authorization. Defining scopes through the Admin Portal lowers the risk associated with traditional service accounts by scoping the authorization to specific APIs. This ensures the application will only be able to access resources for the scopes assigned to the client through the Admin Portal.
Note: the user must be in a role that gives them access to use the API’s that the server is scoped to.
Use the following steps to define scopes for an OAuth2 Client:
Note: this step may be performed before or during the configuration of the OAuth 2 Client.
- Click on Scope:
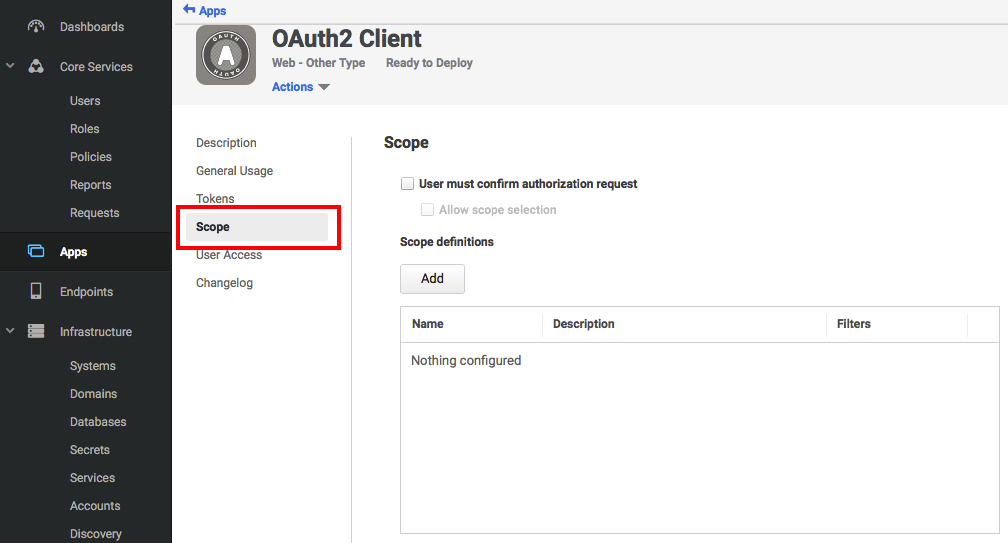
- Click Add.
- Enter a unique name for the new scope, and optionally a description.
- Click Add and enter the endpoint suffix. Note that the wildcard "*" character can be used to specify multiple endpoints. Repeat this step to add additional entries:
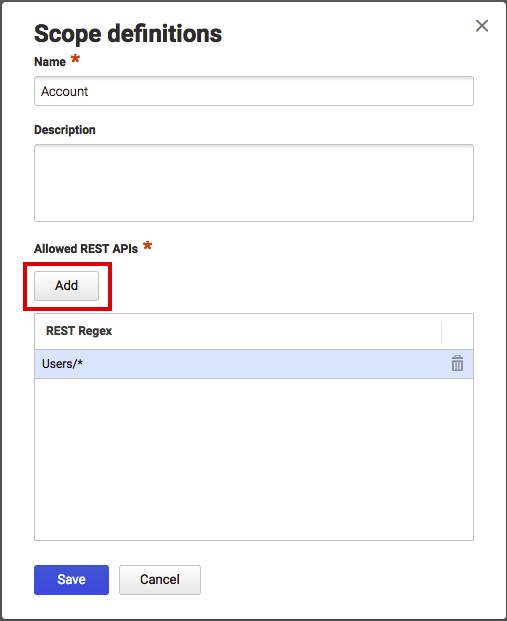
Note: to add a scope for all APIs, enter .* for the REST Regex value.
- Click Save to save the new scope definition and close the popup.
Step 5. Create a Confidential Client
Note: the user interface and workflow described in this section will change significantly in the near future.
If you selected Confidential as the web application Client ID Type during configuration, continue with this procedure. To authorize a confidential client (that is, a client that provides a client ID and client secret), you must create a user entity representing the confidential client.
- Navigate to General Usage tab, click the Click here to create one link, and save any changes if prompted:

- Enter the application's client ID into the Login Name field.
- Enter values into the Email Address and Display Name fields. Confidential clients do not use these values, but they are required in order to satisfy the required fields of the user form.
- Enter the application's client secret into the Password and Confirm Password fields.
- Navigate to the Status section at the bottom and enable Is OAuth confidential client.
- Click Create User. A confidential client who specifies the client ID and secret can now authorize against your Centrify Tenant.
Step 6. Verify Role Access
In order for an application to authenticate the client credentials created in the previous step, you must ensure that the service user created in the previous step is part of a role that has access to the app.
- Navigate to the Roles tab, select a role that will be associated with the client application and add the user created in the previous step to the role.
- Navigate back to the Apps tab and select the application.
- Navigate to the User Access tab, ensure that the role is listed, and click Save if you add a role.
Step 7. Develop a Client
This section illustrates one way to approach client application development using a PowerShell script.
Note: before starting this section, you must first contact the Centrify Ops team to grant permission to the user that you created above, in order to allow them access to the OAuth Client App. Once they have granted access, you will then be able to use the PowerShell example below.
Prepare the PowerShell Script
- Create a PowerShell script named sample.ps1 with the following content, replacing the parts in between "<" and ">" with the respective credentials of the app you created above:
if(get-module oauth){remove-Module oauth 3>$null 4>$null}

Import-Module $PSScriptRoot\psmodules\oauth.psm1 -force 3>$null 4>$null

# enable verbose output
$VerbosePreference = "Continue"

$hosturl = "https://corp.<your tenanat>.com"
$appid = "<your app ID>"
$clientid = "<your client ID>"
$clientsecret = "<your client secret>"
$tokens = Centrify-OAuthImplicitFlow $hosturl $appid $clientid $clientsecret "<desired scope>"-
Create a subfolder called
psmodules. -
Create a PowerShell module within the
psmodulesfolder calledoauth.psm1and populate it with the following code replacing the parts in between "<" and ">" with the redirect URI for your application:
function Centrify-OAuthImplicitFlow($hosturl ,$appid, $clientid, $clientsecret, $scope)

{

	$verbosePreference = "Continue"

	$config = @{}

	$config.authUri = "$hostURL/oauth2/authorize/$appid"

	$config.tokUri = "$hostURL/oauth2/token/$appid"

	$config.redirect = "$hostURL/sysinfo/dummy"
	#$config.redirect = "$hostURL/oauth2/authorize"

	$config.clientID = $clientid

	$config.clientSecret =  $clientsecret

	$config.scope = $scope

	return centrify-InternalImplicitFlow $config

}


function Centrify-InternalImplicitFlow($ocfg)
{

	Add-Type -AssemblyName System.Windows.Forms

	Add-Type -AssemblyName System.Web


	# build web UI

	$form = New-Object Windows.Forms.Form

	$form.Width = 640

	$form.Height = 480

	$web = New-Object Windows.Forms.WebBrowser

	$web.Size = $form.ClientSize

	$web.Anchor = "Left,Top,Right,Bottom"

	$form.Controls.Add($web)


	$Global:redirect_uri = $null

	# a handler for page change events in the browser

	$web.add_Navigated(

	{

		Write-Verbose "Navigated $($_.Url)"

		# detect when browser is about to fetch redirect_uri

		$uri = [uri] $ocfg.redirect

		if($_.Url.LocalPath -eq $uri.LocalPath) {

			# collect authorization response in a global

			$Global:redirect_uri = $_.Url

			$form.DialogResult = "OK"

			$form.Close()

		}

	})

	write-verbose "host is $($ocfg.authUri)"

	write-verbose "client id is $($ocfg.clientID)"


	# navigate to authorize endpoint

	$web.Navigate("$($ocfg.authUri)?debug=true&scope=$($ocfg.scope)&response_type=code&redirect_uri=$($ocfg.redirect)&client_id=$($ocfg.clientID)&client_secret=$($ocfg.clientSecret)")

	# show browser window, waits for window to close

	if($form.ShowDialog() -ne "OK") {

		Write-Verbose "WebBrowser: Canceled"

		return @{}

	}

	if(-not $Global:redirect_uri) {

		Write-Verbose "WebBrowser: redirect_uri is null"

		return @{}

	}


	# decode query string of authorization code response

	$response = [Web.HttpUtility]::ParseQueryString($Global:redirect_uri.Query)

	if(-not $response.Get("code")) {

		Write-Verbose "WebBrowser: authorization code is null"

		return @{}

	}

	$tokenrequest = @{ "grant_type" = "implicit"; "redirect_uri" = $ocfg.redirect; "code" = $response.Get("code") }

	if($ocfg.clientSecret)

	{

		# http basic authorization header for token request

		$b64 = [Convert]::ToBase64String([Text.Encoding]::ASCII.GetBytes("$($ocfg.clientID):$($ocfg.clientSecret)"))

		$basic = @{ "Authorization" = "Basic $b64"}

	}

	else

	{

		$basic =@{}

		$tokenRequest.client_id = $ocfg.clientID

	}


	# send token request

	Write-Verbose "token-request: $([pscustomobject]$tokenrequest)"

	$token = Invoke-RestMethod -Method Post -Uri $ocfg.tokUri -Headers $basic -Body $tokenrequest

	Write-Verbose "token-response: $($token)"

	return $token

}


Export-ModuleMember -function Centrify-OAuthImplicitFlow- Open PowerShell and execute
sample.ps1. You should see output similar to the following:
VERBOSE: host is https://corp.<your tenant>.com/oauth2/authorize/<your app>
VERBOSE: client id is <your client ID>
VERBOSE: Navigated
https://corp.<your tenant>.com/login?cloudRedirect=Oauth2/Authorize/<your app>?bounce=Jvk0Vd...&customerId=<your tenant ID>&zsoInProg=true
VERBOSE: Navigated
https://corp.<your tenant>.com/login?cloudRedirect=Oauth2/Authorize/<your app ID>?bounce=Jvk0VdU...&customerId=<your tenant ID>
VERBOSE: Navigated https://corp.<your tenant>.com/sysinfo/dummy?error=invalid_request&error_description=auth mode not
 allowed
VERBOSE: WebBrowser: authorization code is null
A Closer Look at Centrify-OAuthImplicitFlow
The steps above used the function Centrify-OAuthImplicitFlow to perform OAuth2 authentication which returned an access token.
This section takes a closer look at how that function works.
The function takes in a base endpoint URL, and parameters for the application ID, client ID, client secret, and the name of the desired scope to access:
function Centrify-OAuthImplicitFlow($hosturl ,$appid, $clientid, $clientsecret, $scope)
{
  ...
The function then stores the parameters in the config object and invokes the helper function centrify-InternalOAuthImplicitFlow passing in that object:
...
$verbosePreference = "Continue"
$config = @{}
$config.authUri = "$hostURL/oauth2/authorize/$appid"
$config.tokUri = "$hostURL/oauth2/token/$appid"
#$config.redirect = "$hostURL/sysinfo/dummy"
$config.clientID = $clientid
$config.clientSecret =  $clientsecret
$config.scope = $scope
return centrify-InternalOAuthCodeFlow $config
...
The helper function centrify-InternalOAuthImplicitFlow displays a browser window that renders the Centrify login screen where user credentials are entered and an authorization code is returned.
The function then calls Invoke-RestMethod to invoke the token REST endpoint using authorization code to get an access token:
...
$token = Invoke-RestMethod -Method Post -Uri $ocfg.tokUri -Headers $basic -Body $tokenrequest
...
Use the Access Token in Subsequent Requests
Once you verify that an access token can be successfully returned with the PowerShell script, you can then uncomment subsequent requests in the script that will use the access token. For example, to use the Createuser function which creates a new user, uncomment the following lines in Centrify.Samples.PowerShell.Example.ps1:
$newUserUUID = CreateUser -Endpoint $token.Endpoint -BearerToken $token.BearerToken -Username "apitest@co" -Password "new1234F@!%^"
Write-Host "Create user result: " $newUserUUID
A Closer Look at CreateUser
CreateUser is defined in \centrify-samples-powershell-master\functions\Centrify.Samples.PowerShell.CreateUser.ps1 and contains all of the functionality to invoke the /CDirectoryService/CreateUser endpoint.
The function begins by defining the required parameters to take in the endpoint, access token, user name and password:
function Centrify-OAuthImplicitFlow($hosturl ,$appid, $clientid, $clientsecret, $scope)
{
  ...
The function then stores the parameters in the config object and invokes the helper function centrify-InternalOAuthCodeFlow passing in that object:
...
$verbosePreference = "Continue"
$config = @{}
$config.authUri = "$hostURL/oauth2/authorize/$appid"
$config.tokUri = "$hostURL/oauth2/token/$appid"
$config.redirect = "$hostURL/sysinfo/dummy"
$config.clientID = $clientid
$config.clientSecret =  $clientsecret
$config.scope = $scope
return centrify-InternalImplicitFlow $config
...
The helper function centrify-InternalImplicitFlow displays a browser window that renders the Centrify login screen where user credentials are entered and an authorization code is returned.
The function specifies a grant type of Implicit and calls Invoke-RestMethod to invoke the token REST endpoint using authorization code to get an access token.
...
$tokenrequest = @{ "grant_type" = "implicit"; "redirect_uri" = $ocfg.redirect; "code" = $response.Get("code") }
...
$token = Invoke-RestMethod -Method Post -Uri $ocfg.tokUri -Headers $basic -Body $tokenrequest
...
Use the Access Token in Subsequent Requests
Once you verify that an access token can be successfully returned with the PowerShell script, you can then add subsequent requests to the script that will use the access token. For example, if you have a PowerShell function named Createuser, you could pass the access token via the token.BearerToken variable:
$newUserUUID = CreateUser -Endpoint $token.Endpoint -BearerToken $token.BearerToken -Username "apitest@co" -Password "abc1234^"
Write-Host "Create user result: " $newUserUUID
Inspect the Client's Traffic in Fiddler
Using a network inspection tool is an excellent way to view the OAuth 2 calls being made behind the scenes.
This section provides a brief walkthrough of viewing the network traffic from the example PowerShell above using Fiddler, a popular network traffic analysis tool. See Using Trace Tools for more information about using Fiddler to analyze network traffic between a Centrify client and tenant.
- Run Fiddler.
- Open PowerShell and run
sample.ps1. - Return to Fiddler and select the
/oauth2/authorize/<your application>call in the left pane. - Select the Raw tab for the request in the upper region of the right pane. This shows the first call made by the client application:
GET https://corp.<your tenant>.com/oauth2/authorize/<your app>?debug=true&scope=allrest&response_type=code&redirect_uri=https://corp.<your tenant>.com/sysinfo/dummy&client_id=<your client id>&client_secret=<your client secret> HTTP/1.1In the example above, the request's query parameters specify the application ID, client credentials and the OAuth flow type (response_type is set to code);
- Select Raw tab for the response in the lower region of the right pane to see the response:
HTTP/1.1 302 Found
Cache-Control: private
Content-Type: text/html; charset=utf-8
Location: /login?...

<html><head><title>Object moved</title></head><body>
<h2>Object moved to <a href="/login?cloudRedirect=Oauth2%2FAuthorize%2F<your app>%3Fbounce%3D4vB7IpBgtR">here</a>.</h2>
</body></html>
The response contains the HTML necessary to display a popup window that renders the page at the redirect URI.
- Select the first call to
/loginin the left pane. The request to display the login screen is shown in the right pane:
GET https://corp.<your tenant>.com/login?cloudRedirect=Oauth2%2FAuthorize%2F<Your app>%3Fbounce%3D4vB7IpBgtRThe response contains the HTML necessary to display a popup window that renders the page at the redirect URI:
HTTP/1.1 302 Found
Cache-Control: no-cache, no-store, must-revalidate
Pragma: no-cache
Content-Type: text/html; charset=utf-8
Expires: -1
...
<html><head><title>Object moved</title></head><body>
<h2>Object moved to <a href="https://corp.<your tenant>.com/login?cloudRedirect=Oauth2%2FAuthorize%2F<Your app>%3Fbounce%3D4vB7IpBgtR&customerId=<your tenant>&zsoInProg=true">here</a>.</h2>
</body></html>- Select the second call to
/loginin the left pane. The request to display the login screen is shown in the right pane:
GET https://corp.<your tenant>.com/login?cloudRedirect=Oauth2%2FAuthorize%2F<your app>%3Fbounce%3D4vB7IpBgtR&customerId=<your tenant ID>&zsoInProg=true HTTP/1.1The response contains the HTML necessary to display a popup window that renders the page at the redirect URI:
HTTP/1.1 200 OK
Cache-Control: no-cache, no-store, must-revalidate
Pragma: no-cache
Content-Type: text/html; charset=utf-8
Expires: -1
...

<!DOCTYPE html>

<html>
<head>
    <meta http-equiv="X-UA-Compatible" content="IE=edge,chrome=1" />
    <meta content="text/html; charset=UTF-8" http-equiv="content-type" />

    <style type="text/css">
        html {
            height: 100%;
        }

        body {
            height: 100%;
            color: black;
            font-size: 12px;
        }
    </style>

    <script src="/vfslow/lib/ui/jsutil/external/jquery-1.11.1.min.js" type="text/javascript"></script>
    <script src="/vfslow/lib/ui/jsutil/external/ssoutil.js" type="text/javascript"></script>

    <script type="text/javascript">

        window.onload = function () {

            var cookiesEnabled = areCookiesEnabled();
            var zsoInfo = JSON.parse('{\"ZsoVersion\":\"1.0\",\"ZsoHostName\":\"devdogzso.centrify.com\",\"ZsoCloudAppSessionCtx\":\"KLfUDzD-fK0VrAnNA8fk3a7b4uj8EUVPizC1l1eAWQ41\",\"AndroidFallbackBrowserText\":\"Please click Proceed to continue with this session.\",\"AndroidNonFallbackBrowserText\":\"If this device is enrolled with Centrify Identity Platform, click Proceed to auto signin or wait for 10 sec to go to login page.\"}');

            if (!zsoInfo || !cookiesEnabled) {
                document.location.href = decodeURIComponent(formatTargetUrl(document.location.href).toString());
                return;
            }

            var formattedUrlObj = formatTargetUrl(document.location.href);
            var zsoHostName = zsoInfo.ZsoHostName;

            if (!!zsoHostName) {

                var useHref = true;
                if (useHref) {
                    DoCertZsoViaDocHref(zsoHostName, formattedUrlObj);
                } else {
                    // This approach does not work on IE, works on chrome
                    DoCertZsoViaAjax(zsoHostName, formattedUrlObj);
                }
            } else {
                document.location.href = decodeURIComponent(formattedUrlObj.toString());
            }
        };

    </script>

</head>
<body>
    <script type="text/javascript">

        document.write("<div class=\"loading-indicator\" style=\"display: table; height: 100%; #position: relative; overflow: hidden; width:100%;\">");
        document.write("<div style=\"#position: absolute; #top: 50%;display: table-cell; vertical-align: middle;\">");
        document.write("<div style=\"#position: relative; #top: -50%; margin: 0px auto; width: 385px; vertical-align: center; text-align: middle;padding: 5px;display: block; padding: 2px; border: 1px solid; border-color: #BCB0B0; background-image: none; background-color: #E0E0E0;\">");
        document.write("<table><tr>");
        document.write("<td><img src=\"/vfslow/lib/ui/../uibuild/compiled/centrify/production/resources/images/shared/blue-loading.gif\" style=\"display: block;float: left; margin-left:5px;\"></td>");
        document.write('<td><div style="line-height: 18px; text-align: left; padding-left: 7px; padding-top: 7px; padding-bottom: 7px; font-family: \'Arial\';">Trying to auto sign in, please wait...</div></td>');
        document.write('</tr></table>');
        document.write("</tr></table>");
        document.write("</div>");
        document.write("</div>");
        document.write("</div>");

    </script>

    <noscript>
        <h4>You appear to have javascript disabled. Javascript support is required, please enable before continuing</h4>
    </noscript>
    <div id="noCookieWarning" style="display: none">
        <h4>You appear to have cookies disabled. Cookie support is required, please enable before continuing</h4>
    </div>
</body>
</html>- Select the call to /zso/CertLogin in the left pane. The request to display login screen is shown in the right pane:
GET https://corp.<your tenant>.com/Zso/CertLogin?redirectUrl=https%3A%2F%2Fcorp.<your tenant>.com%2Flogin%3FcloudRedirect%3DOauth2%252FAuthorize%252F<your app>%253Fbounce%253D4vB7IpBgtRJKj%26customerId%3D<your tenant>&noLogin=True HTTP/1.1The response contains the HTML with a link to the redirect page:
HTTP/1.1 302 Found
Cache-Control: private
Content-Type: text/html; charset=utf-8
Location: https://corp.mycentrifytenant.com/login?
...
<html><head><title>Object moved</title></head><body>
<h2>Object moved to <a href="https://corp.<your tenant>.com/login?cloudRedirect=Oauth2%2FAuthorize%2F<your app>%3Fbounce%3D4vB7IpBgtR&customerId=<your tenant ID>">here</a>.</h2>
</body></html>- Select the third call to
/loginin the left pane. The request to display the login screen is shown in the right pane:
GET https://corp.<your tenant>.com/login?cloudRedirect=Oauth2%2FAuthorize%2F<your app>%3Fbounce%3D4vB7IpBgtRJK&customerId=AAA1234 HTTP/1.1The response contains the HTML to display the Centrify login screen:
HTTP/1.1 200 OK
Cache-Control: no-cache, no-store, must-revalidate
Pragma: no-cache
Content-Type: text/html; charset=utf-8
...
<!DOCTYPE html>
<html>
<head>
<!-- Page setup -->
<title>User Portal</title>
<meta http-equiv="X-UA-Compatible" content="IE=8,9,10" />
<meta name="viewport" content="width=device-width, initial-scale=1.0, maximum-scale=1.0, user-scalable=no" />
<link rel="shortcut icon" href="/vfslow/lib/ui/../uibuild/compiled/centrify/production/resources/images/logos/centrify-16-1.png"/>
<!-- CSS includes -->
<link href='/vfslow/lib/ui/../uibuild/compiled/centrify/production/resources/fonts/Roboto.css?_ver=1521011307' rel='stylesheet' type='text/css'>
<link href='/vfslow/lib/ui/../uibuild/compiled/centrify/production/resources/fonts/Icon-Set.css?_ver=1521011307' rel='stylesheet' type='text/css'>
<link href='/vfslow/lib/ui/../uibuild/standalonelogin/login.css?_ver=1521011307' rel='stylesheet' type='text/css'>
<!-- Window style -->
<style type="text/css">
embed {display:none; width:0; height:0; padding:0; margin:0;}
html,
body {
height: 100%;
width: 100%;
margin: 0px;
}
.no-script-alert {
background: #fff;
text-align: left;
padding: 10px 20px 10px 45px;
border-top: 2px solid #ffd324;
border-bottom: 2px solid #ffd324;
}
</style>
<script type="text/javascript">
/**
* Creating a config object that the glued JavaScript can reference without being in an
* ASP.NET context.
*/
var AuthData = {"TenantConfig":{"PortalImage":null,"LoginImage":null,"ForgotUsernameAllowed":true},"KnownTenant":true,"Authenticated":false};
var ServerConfig = {
SkinDef: {"themeColor":"#363a40","theme":"centrify","adminRegisTxtCSSCls":"","cssDirectory":"compiled/centrify/production/resources","emailImage":"/logos/logo-centrify-1.png","footer":{"termsUrl":"https://www.centrify.com/eula/","copyrightText":"© 2004-{0} Centrify Corporation.","termsText":"footer_term","privacyUrl":"https://www.centrify.com/privacypolicy.asp","privacyText":"footer_policy"},"navigationColor":"#979797","loginCssDirectory":"compiled/jsutil/production/resources","backgroundColor":"#FFFFFF","newHelpRoot":"{helpRootServer}/","proxy":{"download64Bit":"Cloud-Management-Suite-win64.zip"},"pageIcon":"/logos/centrify-16-1.png","helpDirectoryBrandName":"","mfa":{"waitGif":"/ellipses_anim.gif","stepsFolder":"/steps/"},"loginImage":"/logos/centrify-zero-trust-security.png","macEnrollDialogImage":"/enroll/centrify-macs.png","brand":"centrify","helpRoot":"{helpRootServer}/{1}/centrify/{2}/index.html","name":"Centrify","portalImage":"/logos/centrify-main-logo.png","aboutWindowIcon":"/logos/centrify-main-logo.png"},
ManifestName: "login",
ResourceBase: "/vfslow/lib/ui/",
Version: "1521011307",
Locale: "en-us",
LoginImage: "/vfslow/lib/ui/../uibuild/compiled/centrify/production/resources/images/logos/centrify-zero-trust-security.png",
LoginSampleText: "user@domain or user@suffix",
EnabledSocialUserIdps : "",
Environment: "Azure",
};
</script>
</head>
<body class='centrify-login'>
<!-- Warning for disabled javascript -->
<noscript><p class="no-script-alert">JavaScript is currently not supported/disabled by this browser. Please enable JavaScript for full functionality.</p></noscript>
<!-- Locale strings -->
<script src="/vfslow/lib/ui/standalonelogin/locale/en.js?_ver=1521011307"></script>
<!-- IE8 compatibility scripts -->
<script src="/vfslow/lib/ui/standalonelogin/compatibility/ie8.js?_ver=1521011307"></script>
<script src="/vfslow/lib/ui/standalonelogin/compatibility/classList.js?_ver=1521011307"></script>
<script src="/vfslow/lib/ui/../uibuild/standalonelogin/login.js?_ver=1521011307"></script>
<script type="text/javascript">
document.addEventListener('DOMContentLoaded', function () {
LaunchLoginView({
containerSelector: '.centrify-login'
});
});
</script>
</body>
</html>- Click on the call to /Security/StartAuthentication which was the endpoint invoked when the user entered their user name. This request to start the authentication process is shown in the right pane.
POST https://corp.<your tenant>.com/Security/StartAuthentication?antixss=1_EapFhR2TbaM9dAELArkQ__ HTTP/1.1

{
   "TenantId":"aaa1234",
   "User":"[email protected]",
   "Version":"1.0",
   "AssociatedEntityType":"Portal",
   "AssociatedEntityName":"Portal",
   "ExtIdpAuthChallengeState":""
}
The response lists the challenge mechanisms, in this example there is one password challenge:
{
   "success":true,
   "Result":{
      "ClientHints":{
         "PersistDefault":false,
         "AllowPersist":false,
         "AllowForgotPassword":true
      },
      "Version":"1.0",
      "SessionId":"VbSPWBeEfUCx..",
      "Challenges":[
         {
            "Mechanisms":[
               {
                  "AnswerType":"Text",
                  "Name":"UP",
                  "PromptMechChosen":"Enter Password",
                  "PromptSelectMech":"Password",
                  "MechanismId":"u_BUmWyI.."
               }
            ]
         }
      ],
      "Summary":"NewPackage",
      "TenantId":"AAA1234"
   },
   "Message":null,
   "MessageID":null,
   "Exception":null,
   "ErrorID":null,
   "ErrorCode":null,
   "InnerExceptions":null
}- Click on the call to /Security/AdvanceAuthenication which was the endpoint invoked when the user entered their password. This request to advance the authentication process is shown in the right pane.
POST https://corp.<your tenant>.com/Security/AdvanceAuthentication?antixss=G_rlZOJ8UBe_WIOFLQTOmg__ HTTP/1.1

{
   "TenantId":"AAA1234",
   "SessionId":"VbSPWBeEfUCxPo...",
   "PersistentLogin":null,
   "MechanismId":"u_BUmWyIiEywf...",
   "Answer":"abc1234",
   "Action":"Answer"
}
The success field in the response indicates if the challenge was successfully fulfilled by the user:
{
   "success":true,
   "Result":{
      "SystemID":"AAA1234",
      "DisplayName":"James",
      "EmailAddress":"[email protected]",
      "CustomerID":"AAA1234",
      "AuthLevel":"Normal",
      "PodFqdn":"corp.<your tenant>.com",
      "Auth":"C34BE7F",
      "User":"[email protected]",
      "UserDirectory":"AdProxy",
      "Summary":"LoginSuccess",
      "UserId":"128cad",
      "SourceDsType":"AdProxy"
   },
   "Message":null,
   "MessageID":null,
   "Exception":null,
   "ErrorID":null,
   "ErrorCode":null,
   "InnerExceptions":null
}- Click on the call to
/OAuth/Authorize/<your application>. This call was invoked after the authentication completed:
GET https://corp.<your tenant>.com/Oauth2/Authorize/<your app>?bounce=4vB7IpBgtR&customerId=AAA1234 HTTP/1.1The response contains a link to the redirect page:
HTTP/1.1 302 Found
Cache-Control: private
Content-Type: text/html; charset=utf-8
Location: https://corp.mycentrifytenant.com:443/sysinfo/dummy?responseType=code&code=OPchWuTZ8FiCrJtXbv...
...
<html><head><title>Object moved</title></head><body>
<h2>Object moved to <a href="https://corp.mycentrifytenant.com:443/sysinfo/dummy?responseType=code&code=OPchWuTZ8FiCrJtXbvauENKz">here</a>.</h2>
</body></html>- Click on the call to
/sysinfo/dummy. This endpoint endpoint is invoked to redirect the user:
GET https://corp.<your tenant>.com/sysinfo/dummy?error=invalid_request&error_description=auth%20mode%20not%20allowed HTTP/1.1Updated 5 months ago
